
How Much Does Skim Coat Cost and What Are the Steps Involved?

Austin’s real estate market has been on fire for a very long time, and it’s not likely to change soon. As real estate has gotten scarcer, homes that were built decades ago doubled or more in price. Often, these older homes were built for styles that were popular for the Austin neighborhoods at the time. Designs that were lower cost several decades ago resulted in a whole lot of homes today with popcorn ceilings and orange peel texture on the walls.
Now, many of these neighborhoods look completely different, and the new owners often want smooth walls and ceilings. As a top drywall company in Austin, we get more calls about texture removal and skim coating than pretty much anything else. Since it is such a detailed and costly process, there is a lot of explaining to homeowners exactly what it means to skim coat a home.
Hopefully, this post can help to provide some answers to common questions, not only for South Austin Drywall customers, but for any homeowners looking for information.
What is Skim Coating?
The simple definition of a skim coat is a thin layer of drywall compound applied to give a wall a smooth glass like surface.
Sounds pretty simple, right?
In all actuality, the part about applying a thin coat of drywall compound isn’t the most difficult feat in the world. Even spreading it out to create a smooth surface can be learned from watching videos on YouTube.
When you actually skim coat a home there are a number of additional steps that are required to go from knockdown texture and popcorn ceilings to a smooth Level 5 glass like finish throughout your home.

Prepping for Skim Coat and Resurfacing
Anyone that’s ever painted anything before knows how important it is to stay within the lines. When skim coating an entire home, or even a single room, this is accomplished by extensive preparation.
Depending on the number of people doing it, prepping an entire 2000 square foot home can take days. The first part that many homeowners often overlook is that pretty much everything needs to be removed from the rooms/home.
When you skim coat, you are going over every surface of the walls and ceilings multiple times. This means that all photos need to be removed from the walls and all furniture needs to be taken out. People often think that everything can be pushed to the center of the room and covered, but this is generally not the case.
As you go over the ceiling area, you need to continually move the ladder or scaffolding to be underneath the section being worked on. Continuously moving furniture from one side of the room to the other isn’t a fun process. Especially when it all needs to remain covered to protect it from dust and drywall compound.
Once all furnishings are removed from the home, then the extensive process of taping, masking, and protecting the floors can begin. Depending on the number of workers, this portion can take from several hours to multiple days. Every area that is not going to get skim coated will need to be fully protected, and lines need to be taped precisely along all edges. Any mistakes can result in damages to your home or possessions.
Accuracy with skim coat preparation is also very important because generally, the next process after you resurface all your walls and ceilings would be to paint. Since the masking, taping, and other prep work is the same, it makes the most sense to only do it once.

Drywall Repairs Before Skim Coating
After all areas are prepped, ladders and scaffolding are set up, and materials are purchased and ready, then any and all drywall repairs need to be done. Often times, this would include fixing any cracking throughout the home, repairing or replacing damaged drywall panels, re-screwing and reattaching any loose or sagging drywall, and any other repairs. This would also include any sanding to remove popcorn texture.
Sometimes these drywall repairs can become very extensive. In certain instances, older drywall may need to be demoed and replaced. In worst case scenarios, most or all of the drywall in the home would need to be completely removed and reinstalled. This can sometimes be necessary when homeowners want a smooth Level 5 drywall finish, but the existing drywall is near the end of its life
It’s important to remember that the foundation you begin with will determine the difficulty and final results of the skim coating process. Starting with a relatively flat surface requires less passes with compound, which can provide a better final result.
Now The Skim Coating Process Begins
Now the actual process of skim coating begins with applying the first layer of drywall compound. There are different products required for each part of the process, but we won’t get into specifics here. One full coat of compound needs to be smoothly applied to every inch of drywall surface area. Depending on the size of the home and number of workers, this can take several hours or days.
Once that process is completed, the initial drying process begins. Humidity levels can greatly effect this making it difficult to schedule when workers need to return. When South Austin Drywall does skim coat estimates, we clearly state the required time frame including the drying days.
After the initial layer of compound has dried, then the work begins to sand and smooth it out. This requires workers to once again go over every inch of drywall surface area sanding by hand.
After that is done, a different product is used to begin adding the actual skim coat layers. Once again, all surfaces of the walls and ceilings will need to have compound applied smoothly and uniformly. Then once again, there will be a period of drying time, which, in the best case scenario, would be a minimum of one full day.
Once that has dried, workers need to once again go over every surface to ensure it’s completely smooth. Often this requires filling in small gaps that developed, which requires additional drying and sanding time.
What is Level 5 Skim Coating? Understanding Drywall Texture
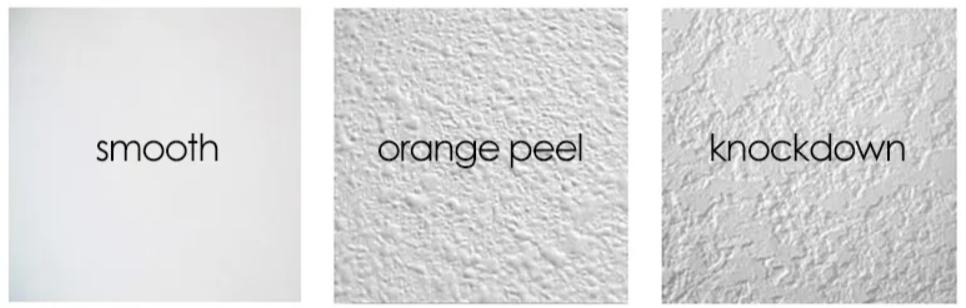
The final finish on the surface of the walls is called the texture. Whether it’s smooth, bumpy, popcorn, or hand-applied, the drywall texture is ultimately what the surface of your walls and/or ceilings will look like after skim coating.
When it comes to smooth surfaces, Level 5 refers to the smoothest drywall finish you can get. By adding multiple layers of drywall compound, sanding, fixing blemishes, an experienced drywall installer can achieve an almost glass like finish. This is very detailed and meticulous work, and not something that many contractors can do correctly. Level 5 finishing requires an almost artistic level of patience that is not commonplace in the home remodeling and construction industry.
So what if you don’t need or want the absolute smoothest finish possible? There are many different types of drywall surface texture that can be applied after skim coating. Some of the most common are orange peel, knockdown (which is a partially smoothed orange peel texture that is “knocked down”), and dozens of hand drawn patterns. For the lowest cost, a basic smooth texture, not as perfect as Level 5, will generally be the least expensive. After that, orange peel will be the next cheapest.
Even though drywall textures like orange peel and knockdown do a good job of masking blemishes, they’re not going to perform magic. It’s very important to understand that any texture that is applied will still need to have a smooth, level, and blemish free surface. Texture can hide future damages from bumps and children playing, but cracks, holes, and other dings will still show.
Finishing Up Skim Coating and Cleanup
The final portion of any skim coat project would involve going over all areas once more to inspect and fix any visible errors. This is what truly separates great drywall companies from all the others. The final attention to detail once the dust settles can ensure that all areas that have been skim coated and textured look perfectly uniform.
Once this process has been completed, and the homeowner approves of all the work, then the cleanup process can begin. Generally, all plastic, floor coverings, and masking tape will be removed and disposed of. But if paint were to be applied after everything fully dries, homeowners can often save time and money by using the same masking tape and coverings for painting afterwards.
How Much Does Skim Coating a Home Cost?
Many factors can affect the total cost of skim coating a home such as the final texture or smoothness desired, and how difficult it will be to prepare and mask everything. Other factors such as high ceilings, removal of trim, ceiling fans, how far the project is from Austin, and other work that may be going on at the time greatly affect the price.
Our best way to generalize the cost of skim coating an entire home is start with a ballpark of $10 per square foot of home. This is generally on the high end in most situations, but could be very realistic. A 3,000 square foot home could potentially cost up to $30,000 to do a complete skim coat on all walls and ceilings, to a smooth finish. This price generally would include basic drywall repairs that are almost always necessary beforehand, all masking, two weeks of work with multiple crew members coming and going as layers dry, and all clean up.
Many factors can reduce the price as well, such as unnecessary rooms and closets or if the flooring does not require masking, but this is a good starting point for what the total cost would be.
So, Is Skim Coating Worth it?
As a drywall contractor in Austin, we’ve had countless conversations with homeowners who had very high hopes of easily resurfacing the walls of their new home, only to have them abandon the idea once they find out the cost. In fact, many people purchase their home knowing they hate the drywall texture, thinking that it’s an easy fix. What they fail to realize is that skim coating, resurfacing, and adding texture requires all the same preparation as completely painting a home, but several times more attention to every inch of surface space.
They also don’t realize that they will basically have to move out of their home to make this happen. It can be done section by section, but that will significantly increase the cost;
For many people though, their vision of a perfect home is one with perfectly smooth surfaces. If that’s the case, then yes, skim coating is absolutely worth it. A perfectly smooth level five surface on a home’s drywall creates an entirely new feel for a home. A newly skim coated wall or ceiling with beautifully applied texture creates a completely different environment inside a room that cannot be replicated otherwise.
A few words of advice if you are considering getting skim coating done on your home:
- Try to do it before you move in
- Plan for a multi week project
- Do not try to have other work done at the same time
- Be prepared for the cost
- Hire a reputable drywall contractor with good reviews
- Be prepared to get to know the crew pretty well!


